In the following block diagram, $\mathrm{R}(\mathrm{s})$ and $\mathrm{D}(\mathrm{s})$ are two inputs. The output $\mathrm{Y}(\mathrm{s})$ is expressed as $Y(s)=G_1(s) R(s)+G_2(s) D(s)$.
$\mathrm{G}_1(\mathrm{~s})$ and $\mathrm{G}_2(\mathrm{~s})$ are given by
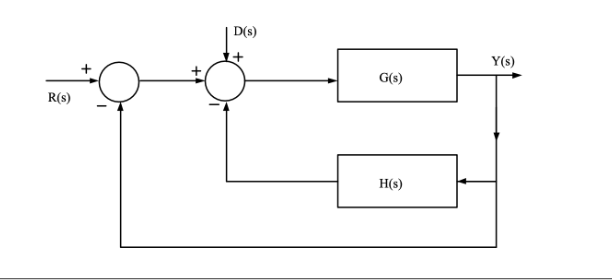
- $\mathrm{G}_1(\mathrm{~s})=\frac{\mathrm{G}(\mathrm{s})}{1+\mathrm{G}(\mathrm{s})+\mathrm{G}(\mathrm{s}) \mathrm{H}(\mathrm{s})} \text { and } \mathrm{G}_2(\mathrm{s})=\frac{\mathrm{G}(\mathrm{s})}{1+\mathrm{G}(\mathrm{s})+\mathrm{G}(\mathrm{s}) \mathrm{H}(\mathrm{s})}$
- $G_1(s)=\frac{G(s)}{1+G(s)+H(s)} \text { and } G_2(s)=\frac{G(s)}{1+G(s)+H(s)}$
- $G_1(s)=\frac{G(s)}{1+G(s)+H(s)} \text { and } G_2(s)=\frac{G(s)}{1+G(s)+G(s) H(s)}$
- $\mathrm{G}_1(\mathrm{~s})=\frac{\mathrm{G}(\mathrm{s})}{1+\mathrm{G}(\mathrm{s})+\mathrm{G}(\mathrm{s}) \mathrm{H}(\mathrm{s})} \text { and } \mathrm{G}_2(\mathrm{~s})=\frac{\mathrm{G}(\mathrm{s})}{1+\mathrm{G}(\mathrm{s})+\mathrm{H}(\mathrm{s})}$